Advanced Magnetics--Step-by-Step Description: Step 7
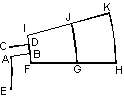
Now, when the edges AB and CD are created, we can rotate them to their final position:
-
On the Edit menu or context menu, click Select All, then Move Selection on the same menu. A dialog box appears.
-
Click Rotation, type 7.5 in the Angle text box, and then click OK. The whole group of edges will be rotated counter-clockwise by 7.5 degrees around the center point (0, 0).
We can now create the vertex E as a mirror image of the vertex A relative to x-axis.
-
Pick the vertex A.
-
On the Edit menu or context menu, click Duplicate Selection, a dialog box appears.
-
Click Symmetry and then OK. By default the vertex is reflected with respect to the x-axis. To confirm creation of new vertex, click Yes in the dialog box.
Next step is to create edges FG and GH. We will again build two arcs and one line segment to get points F, G and H as a result of intersection. Now we create the arcs:
-
Press INS (or Insert Mode from Edit menu, or Insert Vertices/Edges from context menu, or corresponding button on the toolbar) to switch Model Editor to Insert mode.
-
Drag from (0, -17.5) to (0, 17.5). New arc appears in the window.
-
Now drag from (0, -20.5) to (0, 20.5).
To create a line segment:
-
On the Edit menu, click Add Vertices. The dialog box appears.
-
Type 13 for x and 0.75 for y, then press ENTER to create a vertex.
-
Repeat the last step for the vertex with coordinates (22, 0.75).
-
Click Close to close the dialog box.
-
Change Half arc (180°) to Straight Line (0°) as New Edge Angle.
-
Click the left mouse button at first point (13, 0.75) and drag mouse to the second point (22, 0.75).
-
Press INS again to cancel Insert mode and return to Pick mode.