Advanced Magnetics--Step-by-Step Description: Step 9
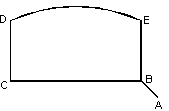
Once we have finished with the fragment of the coil structure, we could create all the coils using the copy operation with rotation. But we will delay this process to keep more room for building the geometry of the rotor. Now we will start creating a magnet of the rotor.
-
On the Edit menu, click Add Vertices to create vertices with coordinates: (6.25, 5), (5, 6.25), (-5, 6.25).
-
Click Zoom to Fit on the toolbar to see the whole model.
Now we create edges AB, BC and two intermediate vertical edges which will eventually become CD and BE:
-
Press INS (or click Insert Mode on Edit menu, or Insert Vertices/Edges on context menu, or corresponding button on the toolbar) to switch Model Editor to Insert mode.
-
Drag from (6.25, 5) to (5, 6.25), from (5, 6.25) to (-5, 6.25) , from (5, 6.25) to (5, 12), from (-5, 6.25) to (-5, 12).
To build the arc ED we will first create a bigger arc of the same radius:
-
Change Straight Line (0°) to Half arc (180°) as New Edge Angle.
-
Drag from (12, 0) to (-12, 0).
-
Press INS again to cancel Insert mode and return to Pick mode.
Now we can get rid of the extra edges, two arcs and two line segments. Finally we have to get a picture similar to the one shown here.
-
Hold down the CTRL key and pick vertices you want to delete.
-
Press DEL (or Delete Selection from Edit menu or context menu).
We are done with the first magnet and can now create the other three.
-
Click and drag diagonally to select all elements of the rotor fragment.
-
On the Edit menu or context menu, click Duplicate Selection, a dialog box appears.
-
Click Rotation and put 90 for Angle and 3 for Copies. Click OK. Confirm creation of new elements by clicking Yes.