Electrostatics Problem--Step-by-Step Description: Step 3
Creating geometry elements
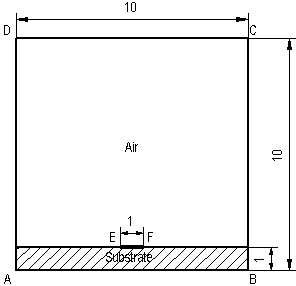
First, we should make a decision concerning dimensions of the problem's region. Since the problem has vertical axis of symmetry, it is convenient to set zero of x-axis at the axis of symmetry.
The first step with the new model in Model Editor is to adjust window dimensions fitting the problem's region. Since the problem has vertical axis of symmetry, it is convenient to set zero of x-axis at the axis of symmetry. So the region fits the square (-5 ≤ x ≤ 5, 0 ≤ y ≤ 10). To make this rectangle occupying most of the window:
-
On the toolbar, click Zoom In.
-
Move mouse pointer to (-5, 0), checking the coordinates in lower right corner of the QuickField application window. You need not position mouse exactly at this point but somewhere to the bottom left not far the point.
-
Click the left mouse button and drag to (5, 10).
-
The window reflects your zoom operation. Click Zoom In once again co close zooming mode.
To simplify object creation, we'll use Snap to Grid feature.
We notice that all sketch element sizes are multipliers of 0.5 cm in both horizontal and vertical directions. To set up the 0.5 cm grid:
-
On Edit or context menu, click Grid Settings, a dialog box appears.
-
In the Horizontal box, type 0.5. Since Anisotropic box is unchecked, the same value appears in Vertical box.
-
Grid origin at (0, 0) is okay, so we need not change anything else. Click OK to close the dialog.